In Banking Transaction you can complete several processes including recording payments that are not being processed through payables, Print Checks, and complete the Make Deposit process which will allow you to select those receipts in Receipt Management you have issued together and make the deposit entry to the bank for the group of receipts that match each deposit.
The pencil icon under the Actions column for each of the entries can be used to reopen each screen and this allows us to view, edit (as long as the entry is not finalized), or use the Other Actions menu (within each screen) to print the journal entry, void, or use the other menu options that are available after an entry is finalized. The print icon prepares the Journal Transaction Report.
In the filter menu, you can search by transaction Type (All, Payment, or Deposit), Document Type (All, Check, ACH, or Other), set a Date, search by Amount, Reference Code, Bank Account, Payee, Status (All, Open, Issued, Void), and if the check has been Printed (All, Yes, No). The clear button will remove any recent selection made in the filter fields and the apply button will run the search including any changes made to the filter and display any findings in the grid view.
You can print or download a list of payment or deposit entries using the printer or excel icons on the right above the grid view. This will print or download only the entries displayed on the grid view.

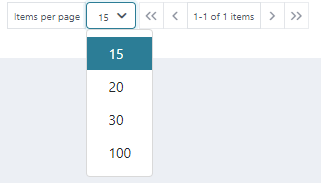
The grid view will by default display the first 15 entries and any additional entries will display in separate pages. There is a count for how many entries/items are available and how many are being displayed on the page out of those available. The arrows can be used to move between the pages.
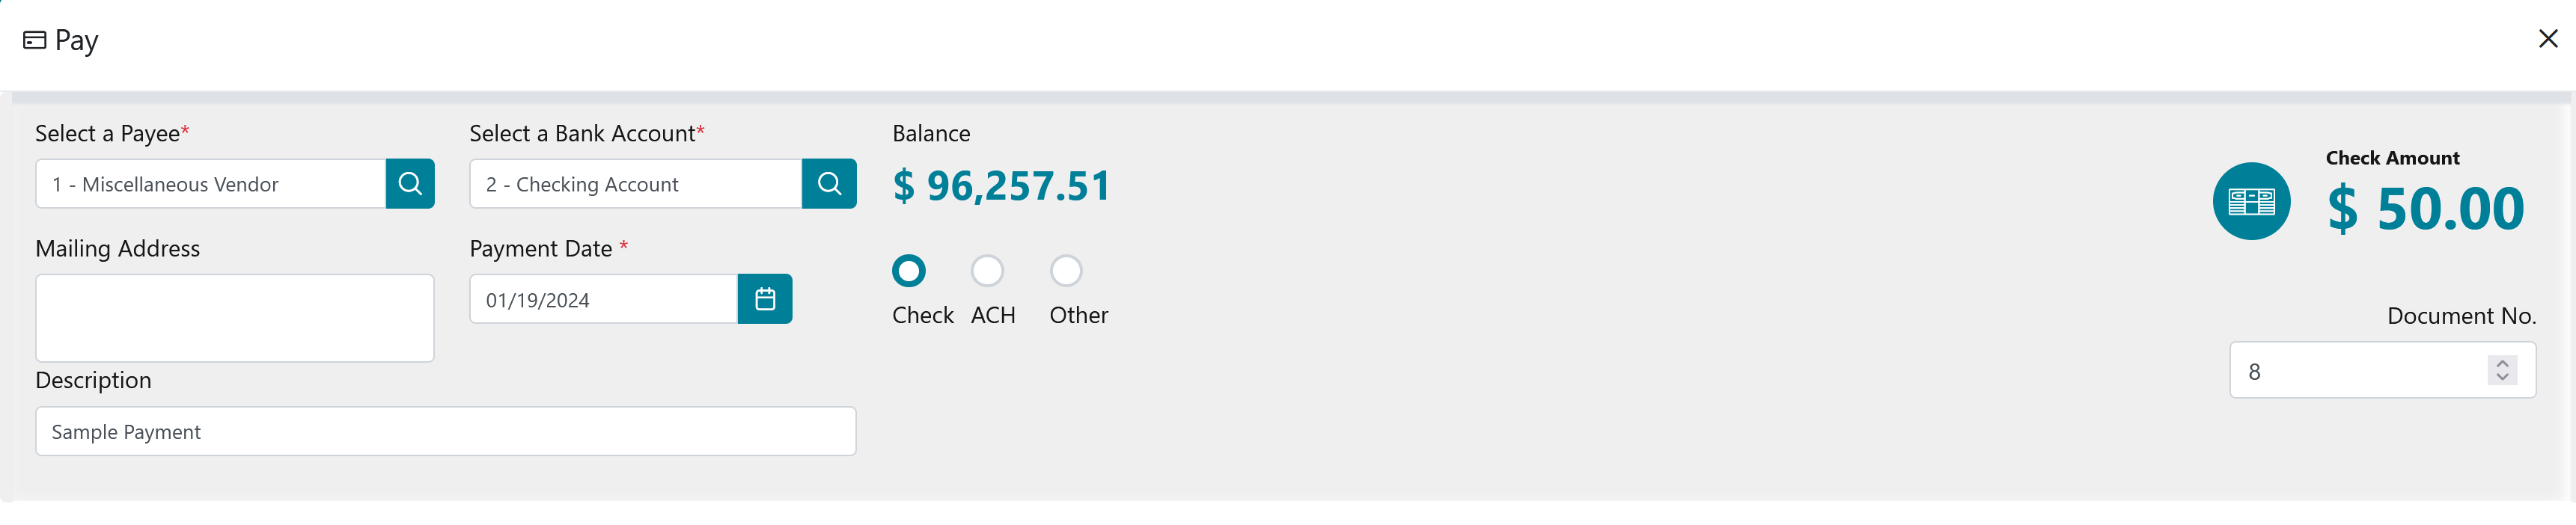
In the Pay screen we will issue a payment, sometimes referred to as an “on demand payment” as these are not paid through payables nor paid bills screen.
We will select the Payee (from a list of Employee, Entity, and Vendor), the Bank Account that we are issuing the payment from, Payment Date (for check payments this will be the check date), and Payment Method (Check, ACH, or Other). We will see displayed a “Balance” and this is populated with a balance amount for the selected bank account to give us a quick view of what is available for us as we issue payments. We can populate a Mailing Address (for check payments this address will print on the check) and populate a Description. The Document No. (check number for example) will auto populate for us when the payment is issued and can be left blank, but we can also override this field to change the document number.
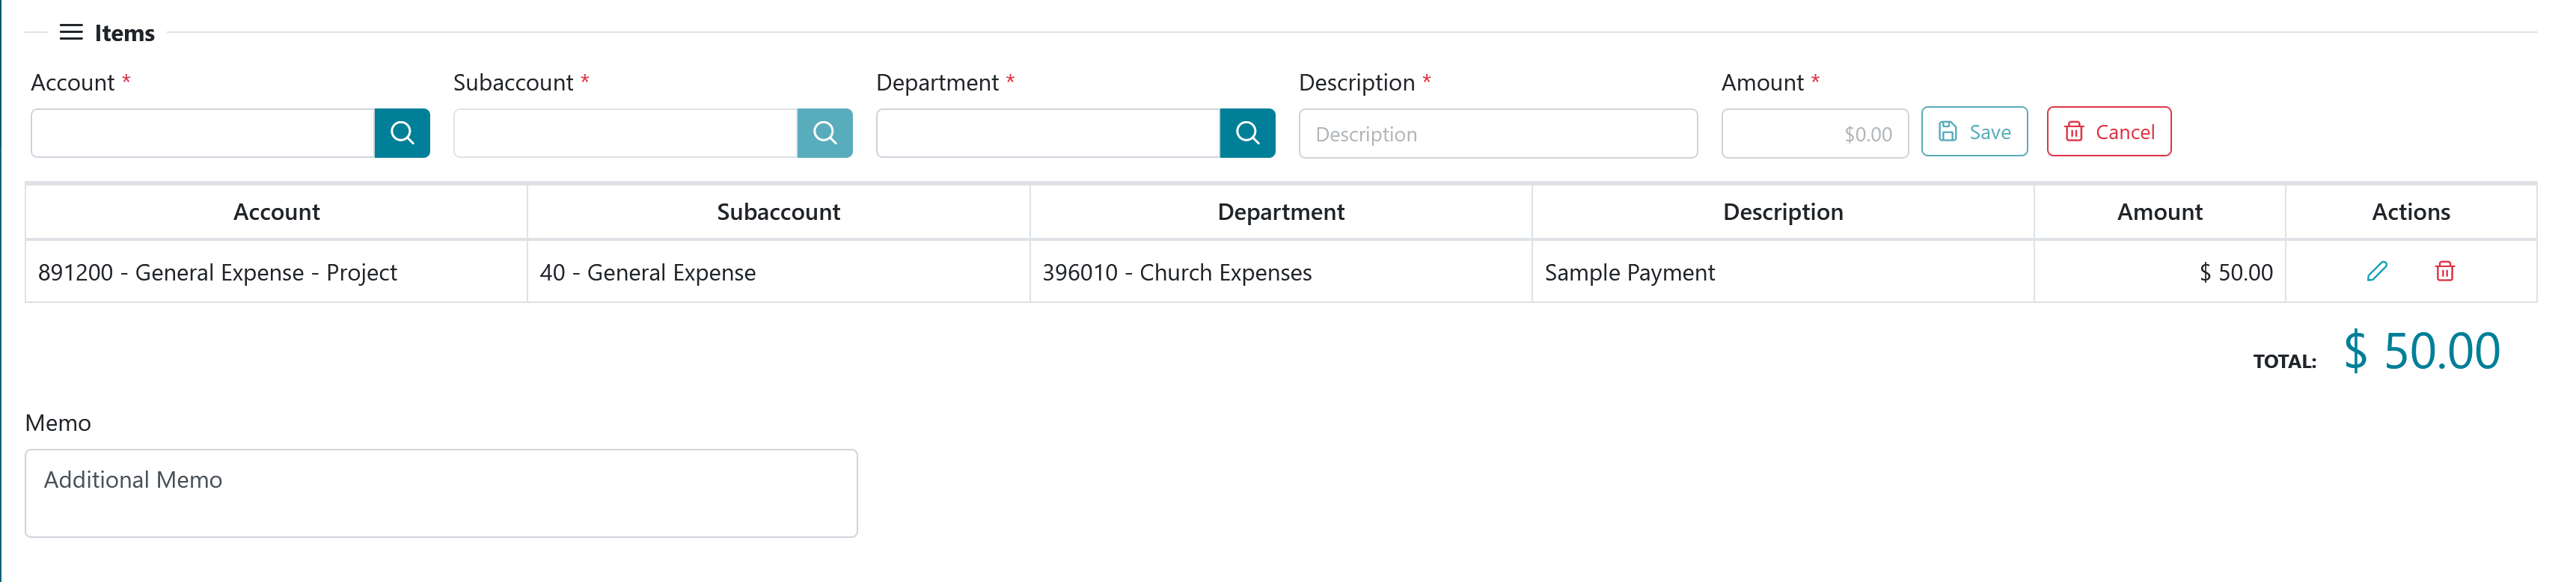
We will then select the general ledger account to post to which would typically be an expense Account for a payment (an account that starts with an 8xxxxx or 9xxxxx), the Subaccount (breakdown within the account like an entity or project for example), Department, populate a Description (which can be the same as the Description at the top of the screen or it can be different if needed or if there are multiple entries), and Amount. The Save button after the amount saves the accounting entry and Cancel will clear the current accounting entry. Once the entry is saved, you can add more accounting entries if needed and we may do this if we want to split out the charges into separate expense accounts or just to have them listed individually. There is a trash bin icon under the Actions column next to the accounting entry and this will allow us to delete the accounting entry. There is a Memo field at the bottom of the screen that can be used to add an additional note.
In the Other Actions menu at the bottom of the screen, we will see an option to “View Journal Entry” which will give us a printout of the entries related to the payment and we will see a “Delete” option which will allow us to delete the payment before it is issued. The other options are grayed out till you issue the payment.

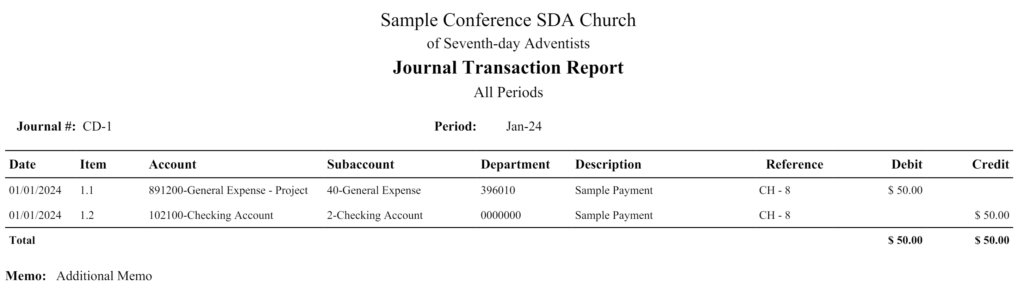
We will use the “Issue and New” button if we are ready to finalize the payment, the system will save the payment entry, close the current payment, and load a new screen to enter another payment. The “Issue and Close” button will save the payment entry, close the current payment, and take us back into the main Banking Transaction screen and the payment should load in the grid view. The “Issue” button will save the payment entry but will leave the Pay screen open for the current payment and the “Save” button will save our work in the current payment entry without yet finalizing it and this will allow us to close the payment and come back to edit it later. The “Close” button on the bottom left will close out of the payment entry, but we would want to ensure that we save our work if needed otherwise any recent changes will be lost and the system will prompt us before closing if we are sure we want to close the current window. The system will save the entry we made to the expense account in our example as debit and internally it will make the appropriate offsetting credit entry on our behalf to the bank account (checking account for example). Reference Transaction Config and see journal entry example below.

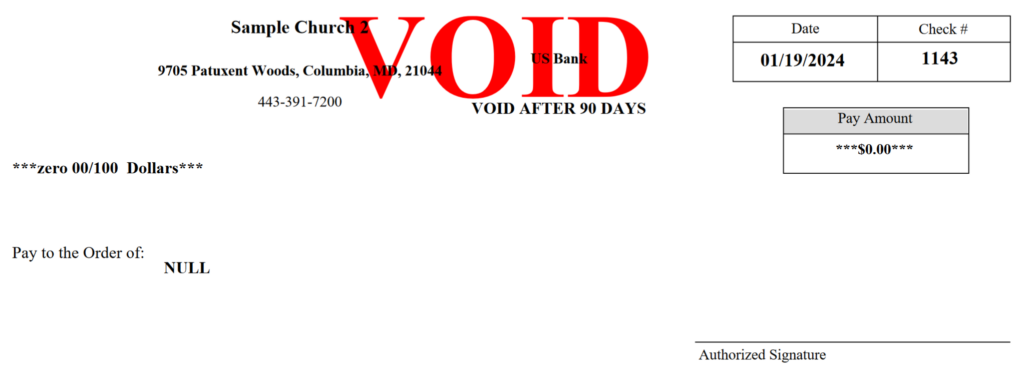
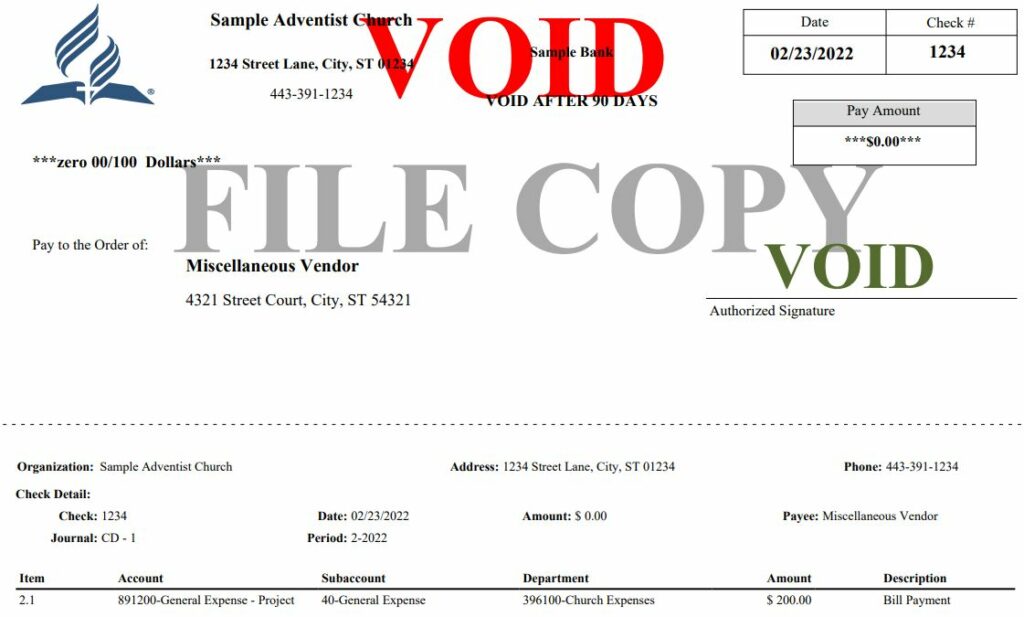
An additional menu to View Journal Entry becomes available in the “Other Actions” section of the Pay screen with the Delete option no longer being available, and this will allow us to Print Check and Void. The Void option will allow us to void the payment and will create additional entries using todays date for us to void, which will credit back into the expense account and debit the payment amount back into the bank account, and in the grid view of the Banking Transaction screen the status for the payment entry will be changed from Issued to Voided and the amount will change to 0.00. After the void, the preview of the check will be marked as voided from the Print Checks screen and Issued Check Report. See example of voided check in Print Checks section. We can also run a General Ledger or Journal Report to view the voided entries. The Print option will print a document for the payment (if a check is issued, the print button will print the check). The check will also be available to print from the Banking Transaction screen in Print Checks.
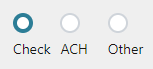
In the Pay screen there are three payment method options: Check, ACH, and Other. The default payment method is check and we will see this option selected in the Pay screen. The check payment method will issue a check that can be printed. The ACH process works like issuing a check but instead the ACH entry would be available for us to download into a text file then we can submit it to the bank, and we would be able to print an ACH Slip that can be provided to the payee. The Other payment method allows us to select from Cash, Check, Electronic, and Other as the payment methods and this allows us to record payments that may be processed through these other methods.
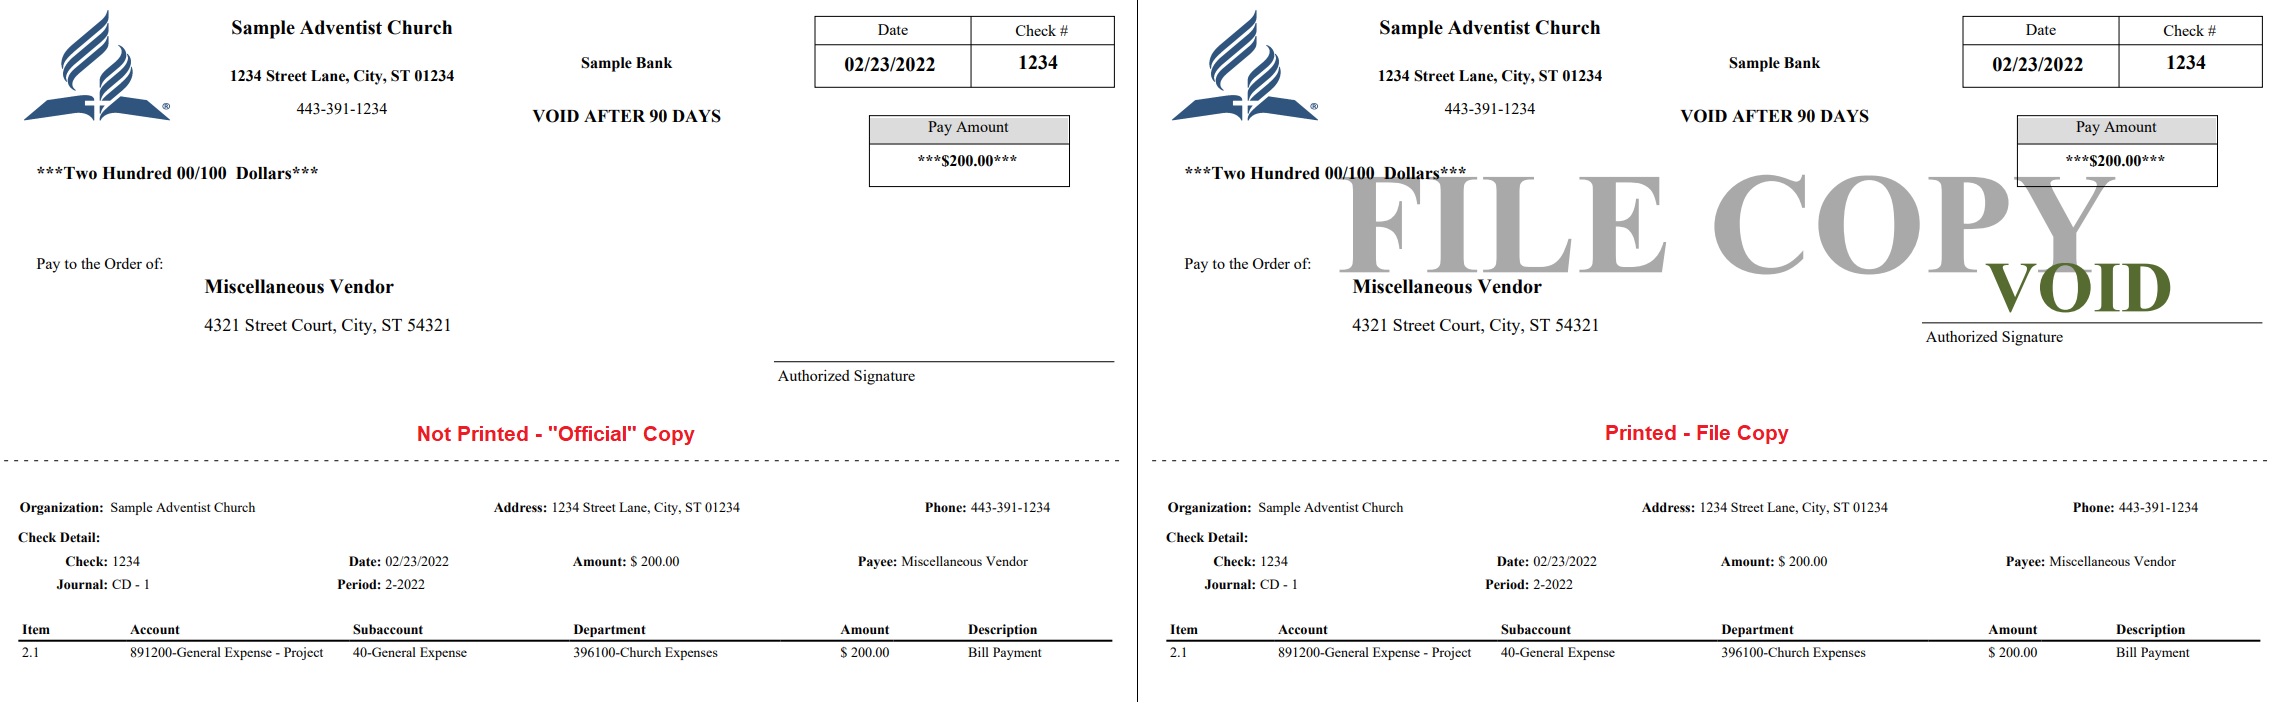
In the Print Checks screen we will find a list of issued checks from the Pay Bills screen in Payable and Receivable and from the Pay screen in Banking Transaction. In this screen we can find official and file copies of checks.
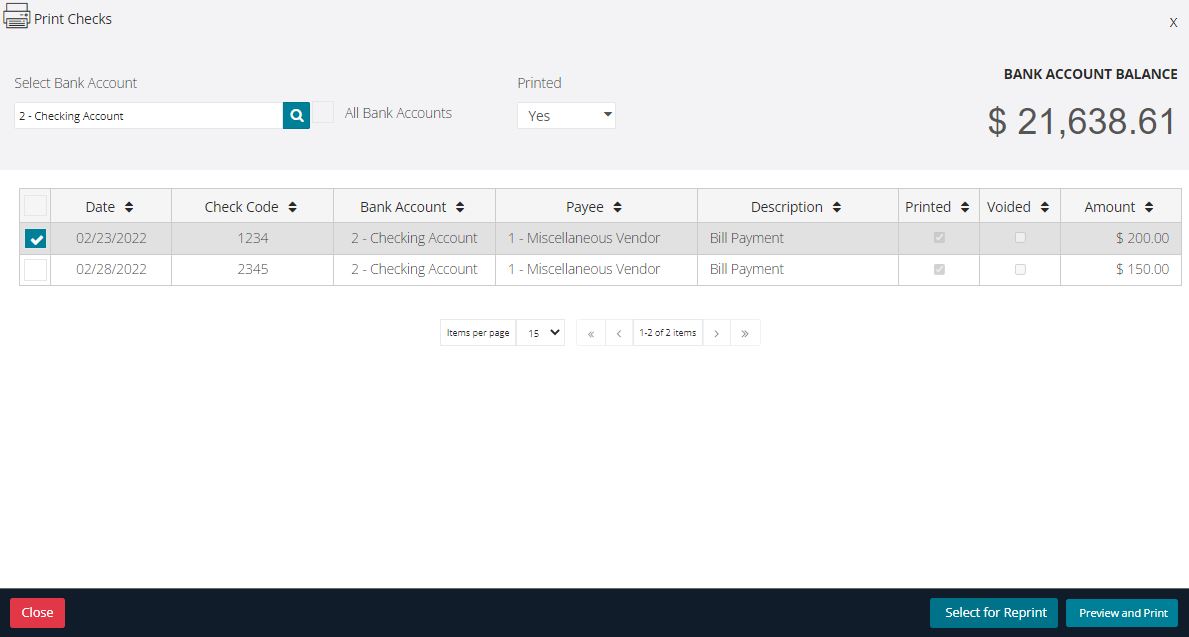
We will select the bank account (this is the bank account we selected when we issued the check payment) and if we issue checks from multiple bank accounts, we can select the “All” box to view the checks for all banks and they will all be listed in the grid view. There is a “Printed” filter with three options: All, Yes, and No. If we have printed a check already, this is considered an official check copy and the system will mark it as “Yes” for Printed, otherwise it will be marked as “No”. The default Printed selection will be “All” and this will display all checks regardless if they have been printed or not but we can select from the drop-down and change this if needed. We will see displayed a “Bank Account Balance” and this is populated with a balance amount for the selected bank account to give us a quick view of what is available for us including the issued payments. The Bank Account Balance will only display when one bank account is selected and if we select the “All Bank Accounts” box, then the “Bank Account Balance” will display a $0.00 balance. The grid view will list check payments and will display check date, check number, bank account it was issued from, payee, check description, if the check has been printed or not, if the check has been voided or not, and check amount and we can sort in each of these columns by clicking on the column header. We can select a check or multiple checks at the same time by selecting the box (boxes) in the first column on the left and when a check is selected, we will have an option at the bottom of the screen to “Preview and Print” and this will open the check in a new tab or new window depending on your browsers settings. If the check has not been printed before, then we will see an official copy of the check for us to print. However, if the check has been “officially” printed before then we will see a file copy of the check. Once we select a check, we may also see another option to “Select for Reprint” and this option will only become available if an “Official” check has been printed as this option is to allow us to reprint that official copy again without the File Copy watermark. See printed check example below and example once the check is voided. The “Select for Reprint” option should only be used for a check if the check has not been sent out yet, and if for example the check got stuck in the printer. If we have sent out the check but the payee lost it for example and it needs to be resent, then the original check would need to be voided and a new one would need to be issued. The “Close” button on the bottom left of the screen will simply close out of the “Print Checks” screen.
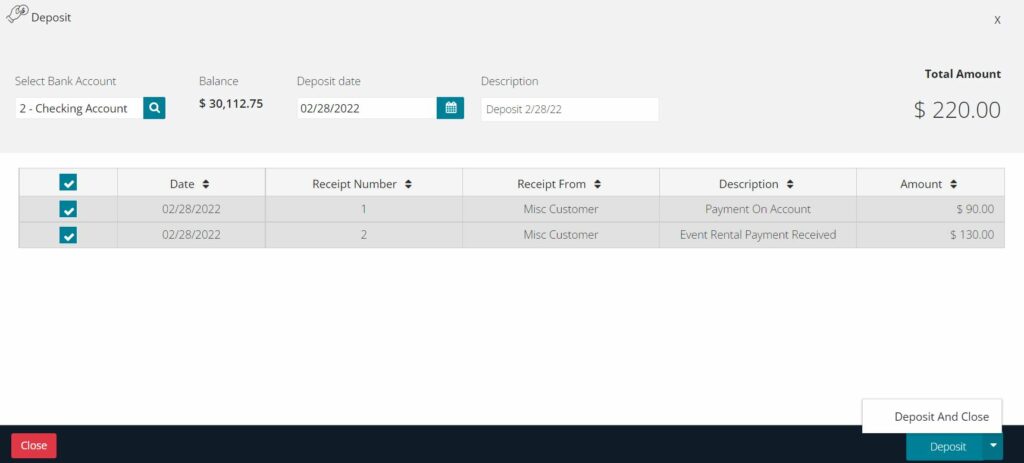
In the Make Deposit screen, we will find a list of receipts that have been issued from the Receive Payment and Receive Money screens in Receipt Management.
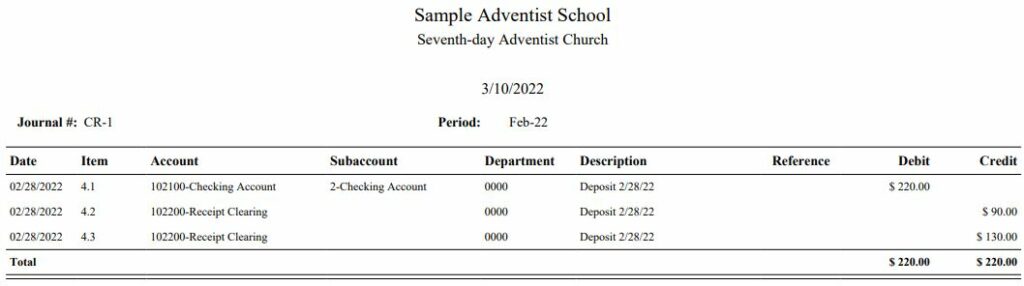
We will select the Bank Account that will receive the deposit and there will be a balance displayed and this gives us a quick view of how much is available in the selected bank account. We will also select the deposit date and populate a description. The Total Amount at the top right of the screen will give us the total amount of the selected entries for deposit. In the grid view, we will see listed receipt entries from the receive payment and receive money screens in receipt management, and we will see receipt date, receipt number, receipt from, description, and amount. We will be able to select the entries that we are ready to deposit by selecting the box on the left of each entry. The “Deposit and Close” button at the bottom of the screen will finalize the deposit for the selected entries and total amount, and will close out of the deposit screen and take us back into the main Banking Transaction screen where we will now see a deposit entry in the grid view with an “Issued” status. the “Deposit” button at the bottom of the screen will finalize the deposit for the selected entries and total amount, but will leave the current deposit screen open. The “Close” button on the bottom left of the screen will close the deposit screen to take us back into Banking Transaction but the system will prompt us before closing if we are sure we want to close the current window. Once the deposit is finalized, the system will save the deposit information, will make entries to clear the receipt clearing account by crediting account 102200-Receipt Clearing and will make a debit entry to the bank account to post the total deposit amount (account 102100-2 for example). Reference Transaction Config and see the Journal Entry example below.
An “Other Actions” menu becomes available in the Make Deposit screen after a deposit is finalized with an option to View Journal Entry, Void, and Print Deposit Slip. The View Journal Entry option allows us to view the journal report for the deposit with entries that clear the receipt clearing account by crediting account 102200 and debiting the bank account for the total deposit amount. The Void option allows us to void the current deposit using todays date which creates reversing entries debiting account 102200 to add back the values to the receipt clearing account and removes the deposit amount from the bank account by crediting the bank account, then in the grid view of the Banking Transaction screen the status of the deposit will be changed from Issued to Void. The Print Deposit Slip option gives us a report listing the items included in the deposit and this can be used to take to the bank and compare with our actual deposit to the bank.